
In early June 1643, The Earl of Essex moved his Army to Thame making his Headquarters there on 10th June. The Battle of Chalgrove took place at about 9-am on 18th June 1643. It was one of a number of small scale Actions between Essex’s Army and the Oxford Royalist Forces that followed the Siege of Reading (April 1643). Using Intelligence provided by the Turncoat Colonel John Urry a Scot and no doubt encouraged by the knowledge that a Parliamentary Pay Convoy of £21,000 would be in the Vicinity, Prince Rupert initiated a Raid on Parliamentarian Billets around Thame. Rupert (of the Rhine 1619-1692) nephew of Charles I already a Noted German Soldier & at aged only 23-yrs, he was appointed Commander of the Royalist Cavalry during the English Civil War. Becoming the Archetypal Cavalier of the War and ultimately the Senior Royalist General.

The Royalists crossed the Chiselhampton Bridge at around 9-pm, marched into Stadhampton and turning North marched to the Main London to Oxford Road where they turned onto the Road & Marched South-east. Passing through Tetsworth at 1-am the Royalists came under Musket Fire from the Church Grounds. At Postcombe Prince Rupert’s Force encountered Men from Colonel Morley’s Regiment of Parliamentary Horse Quartered in the Village, capturing 9 of Colonel Morley’s Troopers, horses & weapons & Colonel Morley’s Standard. Prince Rupert’s men moved on to the small Town of Chinnor which they surrounded by 5-am. Major Legge led the Attack into Chinnor with the Advanced Guard. The Parliamentary Troops in Chinnor back the previous day from the 40-mile March to Islip and back & exhausted were asleep with inadequate Guards Posted. In the ensuing Fight the Parliamentary Troops were overwhelmed losing 50-dead & 150-prisoners from Sir Samuel Luke’s Regiment of Foot. 3 Colours from Luke’s Regiment, many weapons & a quantity of other Booty were taken by the Royalist Troops. There was no sign of the Parliamentary Convoy carrying the £21,000 in Pay. Some Reports have it that the Convoy was warned & hid in Woods. It would seem however that the Convoy had already passed along the Road and was already at Thame by the time Prince Rupert’s Force was in Chinnor. The timings of Prince Rupert’s March do not allow for any significant search of the area. It seems likely that the Capture of the Parliamentary Troops in Chinnor revealed that the Pay Convoy had already passed through the Town the day before. At 6-am the Royalist Foot left Chinnor heading South-west along the Lower Icknield Way in the direction of Watlington. They were weighed down by the Booty taken in Chinnor and delayed by the number of Prisoners to be Escorted. Prince Rupert led the Mounted Regiments along the same Road out of Chinnor ½-hr later at 6.30-am. The Royalist Column on the March will have stretched for some 2-miles. At 7.30-am the Royalist Horse reached the Village of Aston Rowant only 2-miles from Chinnor where they encountered 3-Troops of Parliamentary Horse, the Troops of Major John Gunter, Captain James Sheffield & Captain Richard Crosse. A Parliamentary Picket was seen on Beacon Hill to the Royalist Column’s left. In Thame Sir Philip Stapleton the Senior Parliamentary Commander who ‘had the Watch’ heard the Firing at Chinnor and sent 2-Troops of Dragoons to Investigate. A party quickly returned to inform Sir Philip Stapleton that the Garrison at Chinnor had been wiped out by a large Force of Royalists who were making off towards Watlington along the Lower Icknield Way. The rest of the Parliamentary Dragoons sent to Chinnor set off in pursuit of Prince Rupert, catching them up at Aston Rowant where Major Gunter’s Horse were endeavouring to interfere with the Royalist withdrawal. At the Parliamentary Headquarters in Thame it was clear to Sir Philip Stapleton that the Royalists were intending to reach Oxford via the Chiselhampton Bridge over the Thame River turning off the Lower Icknield Way around Lewknor & Marching through South Weston. Stapleton dispatched Captain Dundasse’s Troop of Dragoons towards Chalgrove to intercept the Royalists while he assembled a larger Force to follow. It is an important and remarkable feature of the Battle of Chalgrove that the Parliamentary Force sent from Thame later that morning comprised the Troop & Company Commanders of the Earl of Essex’s Army who had assembled in Thame to collect the Pay for their Troops & Companies.
Prince Rupert’s Life Guard Commanded by Lieutenant-Colonel Daniel O’Neale & Lord Percy’s Regiment of Horse Attacked Gunter’s men and drove them off in disorder. Soon after this Engagement Captain Dundasse’s Dragoons came up with Major Gunter & Gunter dispatched Dundasse to Thame to inform Sir Philip Stapleton of the developments. Dundasse reached Thame at around 9.30am. Also at around 9.30am Major Gunter’s Force of Horse & Dragoons was joined by the Body of Troop & Company Captains from Thame and Gunter took overall Command of the Force. Also in the Area was Colonel John Hampden, 2nd-in-Command to the Earl of Essex accompanied by Colonel John Dalbier, the Parliamentary Quartermaster-General & Sir Samuel Luke, whose Regiment had been Annihilated in Chinnor. Hampden, who had no Cavalry experience joined Captain Crosse’s Troop (one of the Troops from Aston Rowant) in Gunter’s ad hoc Force now numbering around 1,000 Mounted men, many of them Infantry Officers, for the Attack on Prince Rupert’s Retreating Force. Gunter faced 3-Royalist Regiments of Horse of proven aggression & skill on the Battlefield Commanded by Prince Rupert, a ruthlessly effective Commander of Cavalry. The 2-Forces of Cavalry were roughly equal in size. The Royalist Column strung out with Prisoners, Looted Weapons & Valuables stretched over 2-miles of the Track, the Foot with the Prisoners and Wagons to the Front, followed by the Dragoons and then the Body of Horse. The Route to the Chiselhampton Bridge took the Royalist Column along a Track bounded by a ‘Great Hedge’ that acted as a Parish Boundary. The ‘Great Hedge’ was a double Hedge running East to West with a narrow Track between the 2 sections of Hedge and was of sufficient height to be Stock-proof, probably shoulder height. On reaching the area of Chalgrove Prince Rupert wheeled his Regiments of Royalist Horse into Line in a Field facing the Parliamentary Cavalry that were appearing over Golder Hill to the South-east while the Royalist Foot continued along the Track to the Chiselhampton Bridge with the Prisoners, Captured Weapons & other Loot. The Dragoons acting as a Rearguard to the Foot dismounted and lined the Hedgerows in Ambush against any Parliamentary Pursuit. The Royalist Horse formed with Prince Rupert’s Regiment in the Centre with the Prince’s Life Guard to its Right, the Prince of Wales’ Regiment on the Left flank and Lord Percy’s Regiment on the Right Flank.
The Parliamentary Horse approached down the Slope of Golder Hill from the direction of Thame entering a long Field separated from the Royalist Horse by the Great Hedge. The Parliamentary Horse held back at the top end of this long Field. Prince Rupert ordered his Troopers to continue the Retreat after the Royalist Foot to entice the Parliamentary Force to approach nearer. It would seem that at this Stage Prince Rupert had in mind to lure the Parliamentary Horse into the Ambush set further along the Track by the Royalist Dragoons. The Parliamentary Horse & Dragoons moved down the Field towards the Great Hedge, the Horse turning to follow the direction of the Royalist Column moving parallel to it along the Great Hedge, while the Parliamentary Dragoons dismounted took positions behind the Great Hedge and opened Fire on the Royalist Horse, inflicting some casualties. This main Body of Parliamentary Horse is described in ‘the Late Beat up’ as comprising 8-Troops or Cornets of men. ‘The Late Beat Up’ describes a Reserve of 3-Troops of Parliamentary Horse at the top of the Field near to Warpsgrove House while a further small Reserve was at the Base of Golder Hill. The advice of his Senior Officers to Prince Rupert was to continue after the Foot and permit the Parliamentary Horse to encounter the Ambush set by the Royalist Dragoons further along the Track. Prince Rupert took the view that the Parliamentary Force was too close for such a Course. He was resolved to Attack, as was always his inclination.

The Fire of the Parliamentary Dragoons caused Prince Rupert to retort ‘Yeah their Insolency is not to be Endured’ and wheeling his Horse he leapt the Great Hedge. Prince Rupert was immediately followed by 15-men of his Life Guard that he formed into a Line. The rest of the Life Guard got through or over the Great Hedge, described in the Royalist account as ‘jumbled over after him’. The Parliamentary Dragoons remounted & hurried away back up the Hill. Lieutenant-Colonel Daniel O’Neale led Prince Rupert’s Regiment around the Great Hedge to the left of Prince Rupert’s Life Guard putting his Regiment immediately in front of the Parliamentary Horse. The Parliamentary Horse Fired 2-Pistol & Carbine Volleys before Prince Rupert’s Regiment led by O’Neale charged home on them. Prince Rupert charged the left Flank of this Body of Parliamentary Horse with his Life Guard and was followed into the Attack by Lord Percy’s Regiment which had found a way through or around the Great Hedge. At the other end of the Royalist Horse Line the Prince of Wales’ Regiment led by Major Daniel attacked the right Flank of the Parliamentary Horse. The Parliamentary Horse would seem to have been largely still in Column and received the Royalist Charge at the Halt with small Arms Fire, always a Fatal Response to a Mounted Charge. The Royalist Account describes the Parliamentary Horse as putting up an unusually stiff resistance with Pistol Fire. This is consistent with the Troops being largely Officers. Inevitably the Parliamentary Horse were driven back on the 3-Troops positioned near Warpsgrove House which were in turn Routed. Prince Rupert’s 3-Regiments pursued the Defeated Parliamentary Horse for 1¼-mile back over Golder Hill towards Thame before Halting & Returning to their original Route for the Chiselhampton Bridge. The Defeated & Fleeing Parliamentary Horse & Dragoons were met further up the Thame Road by Sir Philip Stapleton coming up with his Regiment. Stapleton stopped the Rout but did not pursue the Royalist Force. Both in the initial Charge and in the subsequent Melee with Pistols & Swords the Parliamentary Horse & Dragoons were severely handled and suffered substantial casualties one of whom was Colonel John Hampden Fighting as a Trooper. Major Gunter was killed in the Fight by the Great Hedge. The Royalist Force reached Oxford at 2-pm and was greeted with an ecstatic welcome as it entered the City with its haul of Prisoners & Booty and Accounts of the successful Cavalry Action.

Leaving Oxford on 17th June 1643, the 6ft-4in now 24-yr-old Prince Rupert marched with a Force of 1,100 Horse, 500 Infantry & 350 Dragoons across the Chislehampton Bridge across the River Thame. Early next morning, the Royalists stormed Roundhead Garrisons at Postcombe & Chinnor, killing about 50-men & leaving both Villages in Flames. Rupert hurried on hoping to surprise the Pay Convoy, but its Escort was warned of his Approach & the Wagons were hidden in Woodland. Unable to find his Quarry, Rupert withdrew in good Order towards Oxford. Although he ‘Missed’ the Parliamentarian Payroll, Rupert was highly successful in disordering 2–Parliamentarian Quarters at Chinnor & South Weston, capturing or killing 170 Enemy Troops and easily outwitting & out-Manoeuvring his Enemies at Chalgrove. The importance of Chalgrove lies not with its Military significance; there were numerous other Small Actions of similar Scale throughout the Country during the Civil War (1642-1651). It was rather its Political implications in the Loss of Colonel John Hampden, who was fatally wounded in the Conflict. Hampden had been a key Political Figure on the Parliamentarian side both before & during the War and his unfortunate Loss was keenly felt.

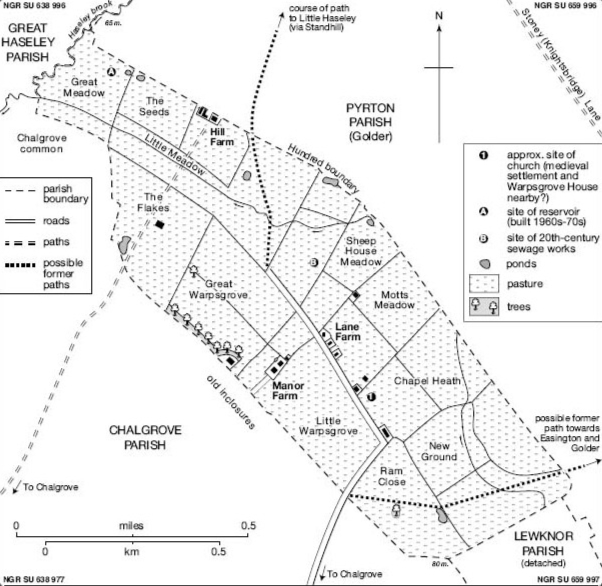
Chalgrove Battlefield remains largely as Agricultural Land. The WW2 Airfield to the West covers a substantial area of Land but appears not to impinge upon the core of the Battlefield. The Battlefield lies between the Airfield & Warpsgrove Lane, thought the precise area of deployment is the subject of some debate. Cases have been put forward for the Upper Marsh Lane area by the Chalgrove Battlefield Group or closer to the Airfield by others. To the East of Warpsgrove Lane there is extensive Industrial Development. There are no Public rights of way across the Battlefield, but fortunately, Warpsgrove Lane runs right across the Battlefield from the former Open-field into an area of what was in 1643 Pasture Closes. A Monument to John Hampden stands at the Crossroads on Warpsgrove Lane where Roads lead off to the left & right to the appropriately named ‘Monument Industrial Park’ & ‘Monument Farm’.
It is argued that the Battle’s Military & Political importance to the early years of the Civil War has been underestimated in standard accounts, partly because it is often confused with a separate Skirmish near Chinnor (50-Killed & 120-Prisoners Taken) At Chinnor, the Royalist’s deployed their Musketeers & named the Street Fight a Raid. Many other details about the Battle require clarification, including the Site of the Battlefield, which hitherto has not been properly Established. The Royalist & Parliamentarian Armies’ Manoeuvres preceding the Battle are investigated, including the Circular Route taken by Prince Rupert & his Army from Oxford via Chinnor to Chalgrove. The Times & Places noted en route are plotted in the Oxfordshire Landscape with the aid of old Maps & Documents. The most likely Site of the Battle is made clear, as well as the reasons why it has been confused with the Action at Chinnor. The significance of the Victory by a numerically inferior Royalist Force is discussed. The traditional view is that Chalgrove was a Skirmish and not a Battle. English Heritage recorded in its Battlefields Register that, ‘in strict terms of scale, Chalgrove Field was a Skirmish.’ The Battlefields Trust concur that Chalgrove was only important because Col John Hampden (49-yrs)) was mortally wounded during the Battle. Indeed, Chalgrove was not included on the original proposals for the Battlefields Register in 1994. After representations to the Assessing Panel, it was added to the Register in 1995 purely because of Hampden’s involvement. These Traditional views rest ultimately on the Earl of Clarendon’s ‘History of the Great Rebellion’.

To the East of the Battlefield are a number of Low Hills, over which the Parliamentarians approached the waiting Royalists.
Ruperts Forces at 7.30-am discover a Body of Parliamentarians in Aston Rowant, referred to as “in the Village hard upon the left hand of us“, which Essex confirmed was Major John Gunter, Captain James Sheffield & Captain Richard Crosse’s Troops. These 200-Troopers were soon joined by Sanders & Buller’s Dragoons and together these 300-men engaged the Royalists in a Skirmish around South Weston. (The Skirmish that the Earl of Essex, by Accident or Design, confused with the Battle of Chalgrove.) The Skirmishers were joined by Colonel John Hampden, having been out abroad with Sir Samuel Luke & Col John Dalbier seeing Major Gunter’s Forces, they did go along with Dundasse’s Dragoons.

‘Colonel Dubeir the Quartermaster General did likewise come to them: with these they drew neare the Enemy, and finding them marching away, kept still upon the Reare for almost 5-miles. In this time there joyned with them Captain Sanders Troop and Captain Buller, with 50 Commanded men, which were sent to Chinner by Sir Philip Stapleton, who had the Watch here that night at Thame, when he discovered the Fire there, to know the occasion of it, he likewise sent one Troope of Dragoones under the Command of Captain Dundasse, who came up to them. There were likewise some few of Colonell Melves Dragoons that came up to them: at length our men pressed them so neer, that being in a large Pasture Ground they drew up, and not withstanding the inequality of the numbers, we not having above 300-Horse, our men charged them very gallantly, and slew divers of them; but while they were in Fight, the Enemy being so very strong, kept a Body of Horse for his Reserve, and with that Body wheel’d about and charg’d our men in the Reare, so that being encompassed and overborne with Multitude, they Broke and Fled, though it was not very far; For when I heard that our men Marched in the Reare of the Enemy, I sent to Sir Philip Stapleton, who presently Marched toward them with his Regiment; & though he came somewhat short of the Skirmish, yet seeing our men Retreat in that disorder, he stopt them, caused them to draw into a Body with him, where they stood about an hour: Whereupon the Enemy Marched away. In this Skirmish, there were slain 40 & 5 on both sides, whereof the greater part were theirs.’
Leaving Thame after 8.00-am and Riding hard the 6-miles across the County to Chalgrove with the best of Horses would take 30/40-mins (say 8.30-am). 1,100 Cavalry & Dragoons Commanded by Stapleton in Pursuit of Rupert, with the intention of delaying him long enough for a larger Force from Essex’s Main Army to cut off his Retreat. This timing marks the duration of the Battle and confirms why the casualties on Parliament’s Side were so high. Parliament’s men “kept still upon the rear for almost 5-miles” following the Royalists up to Clare Crossroads to where the Road from Thame meets the Highway to Weston. The Skirmishers could see a large Body of Parliaments’ men riding with all speed to Clare Crossroads. These 700–800 men were Essex’s most Senior Officers who had been receiving their Regiments’ Pay when the Alarm came from Chinnor.

In the early hours of the Saturday morning, Rupert surprised Enemy Outposts in Chinnor & South Weston but failed to find the Parliamentarian Payroll Convoy. Now harried by Parliamentarian Troops, Rupert decided to withdraw to Oxford. Rupert sent his Infantry on ahead to secure the Thame River crossing at Chiselhampton and, 4-miles to the East, drew up his Cavalry in Chalgrove Field to face his Pursuers and give time for his Foot to get clear. Sending Colonel Lunsford ahead to secure Chislehampton Bridge, Rupert’s Dragoons lined the Route back to Chiselhampton to maintain communications and to lie in Ambush should the opportunity present itself. Rupert himself & 1,000-Horsemen turned to face the Advancing Parliamentarians. Against all advice, instead of Retreating to draw the Parliamentarians into an Ambush, Prince Rupert suddenly turned his Horse and leapt the Hedge, which separated the 2-Sides. He was followed by his Cavalry, and ‘with Sword & Pistol‘ the Royalists beat back their Pursuers, who fled Eastwards over Golder Hill to Easington. The Royalist Retreat from Chinnor took them across County to Golder Hill and the Troops’ movements of those descending this Hill has been plotted logically in a timed progression to the Chalgrove Battlefield.

The Royalist Account of what happened is much fuller:
His Highnesse was now making Halt in Chalgrove Cornefeild: about a mile & half [sic] short of Chesel-hampton Bridge. Just at this time (being now about 9-o’clock) we discerned severall great Bodyes of the Rebells Horse & Dragooners, coming down Golder-Hill towards us: from Easington & Thame: who (together with those that had before Skirmished with our Reere) drew down to the bottom of a Great Close, or Pasture: ordering themselves there among the Trees beyond a Great Hedge, which parted that Close from our Field – The better to intice them on, the Prince with his Horse made Show of a Retreat: whereupon the Rebells advanc’t cheerfully: doubling their March for eagernesse, and coming up close to us. Then we discern’d them to be 8-Cornets of Horse, besides about 100-Commanded Horse, and as many Dragooners of Colonell Mills (Melves, my Lords Relation writes him) his Regiment, now led by Captaine Middleton. We were now parted by a Hedge, close to the midst whereof the Rebells brought on their Dragooners; and to the end of it came their Forlorne hope of Horse. Their whole Body of 8-Cornets faced the Princes Regiment & Troop of Lifeguards, and made a Front so much too large for the Princes Regiment that 2-Troops were faine to be drawn out of the Prince of Wales Regiment, to make our Front even with them. And this was their Order. Besides which, they had left a Reserve of 3-Cornets in the Close aforesaid among the Trees, by Wapsgrove House, and 2-Troops more higher up the Hill, they were in sight of one another by 9-o’clock in the morning.
The Princes Battalions were thus ordered. His Highnesses own Regiment, with the Lifeguards on the Right-hand of it, had the Middle-ward: the Prince of Wales his Regiment making the Left-wing, and Mr Percyes having the Right. Both these Regiments were at first intended for Reserves: though presently they ingaged themselves on the incounter. ‘Twas diverse of the Commanders Counsells, that the Prince should continue on the Retreat, and so draw the Rebells into the Ambush, but his Highnesse Judgment oversway’d that; for that (saith he) the Rebells being so neere us, may bring our Reere into confusion, before we can recover to our Ambush. Yea (saith he) their insolency is not to be endured. This said, His Highnesse facing all about, set spurrs to His Horse, and first of all (in the very face of the Dragooners) leapt the Hedge that parted us from the Rebells. The Captaine, and rest of His Troop of Life-guards (every man as they could) jumbled over after him: and as about 15 were gotten over, the Prince presently drew them up into a Front, till the rest could recover up to him. At this the Rebells Dragooners that lyned the Hedge fledd having hurt and slaine some of ours with their first vollie. Meanetime Lieutenant-Colonell O’Neale having passed with the Princes Regiment beyond the end of the Hedge on the left hand, had begunne the encounter with 8-Troops of Rebels. These having before seene ours facing about, took themselves of their speed presently, and made a faire stand till ours advanc’t up to Charg them. So that they being first in order, gave us their first Vollie of Carbins & Pistolls at a distance, as ours were advancing: yea they had time for their second Pistols ere ours could charg them. The hottest of their charg fell upon Captain Martins, and Captain Gardiners Troops, in Prince Ruperts Regiment: and indeed the whole Regiment indured the chief shock of it. To say the truth; they stood our first charg of Pistols & Swords, better than the Rebells have ever yet done, since their first beating at Worcester; especially those of their Right-wing: for their Left gave it over sooner: for that the Prince with his Lifeguards, with Sword & Pistoll charging them home upon the Flanck (not wheeling about upon their Reere, as the London Relation tells it) put them in Rowte at the first Encounter. By this time also was Generall Percy with some Troops of his Regiment fallen in upon that Flanck, and followed upon the execution. As on the other Wing did Major Daniel with the Prince of Wales his Regiment: so that now were the Rebels wholy Rowted. Some of ours affirme, how they overheard Dulbire (who brought up some of the Rebells first Horse) upon sight of the Princes Order and dividing of his Wings, to call out to his People to Retreat, least they were hemb’d in by us.
The Rebells now flying to their Reserve of 3-Colours in the Close by Wapsgrove House, were pursued by ours in execution all the way thither: who now (as they could) there rallying, gave occasion to the Defeat of those 3-Troopes also. So that all now being in confusion, were Pursued by ours a full mile & quarter (as the neighbours say) from the place of the first Encounter. These all Fled back again over Golder hill to Easington: and so farre Sir Philip Stapleton with his Regiment was not yet come. And if he Stopt and drew the Retreaters up into a Body, and made a Stand for an hour with them (as the London Relation tells us) ’twas surely behind & beyond the Great Hill where ours could not discern them. Yea plainly our 2 Prisoners since their returne affirm, that ’twas 2-miles from the place of fight ere he met them, nor yet could he stay the Parliamentiers from running. Before this, and in time of the Fight, some 3-Cornets of them were observed to Wheele about; as if they intended either to get betwixt us and Chesel Hampton Bridge, or to Charge us upon the Reere, which being observed by Lieutenant Colonell O’Neale, he borrowed 2-Troopes of Generall Percyes Regiment, and made out after them: which they perceiving, turn’d Bridles about, and made hast back again to their fellowes.

“His Highness was now making Halt in Chalgrove Cornfield” and “We discerned several great Bodies of the Rebels Horse & Dragooners, coming down Golder-hill towards us.” who “drew down to the bottom of a Great Close.“ – Rupert viewed Parliament’s Troops “ordering themselves there among the Trees beyond a Great Hedge in a Great Close”. This Sight-line of Data gives an accurate placement of where Prince Rupert assessed the Strength of his Adversaries. Rupert turned to follow his Infantry leaving the Enemy the other side of the Great Hedge. The only gap in the Great Hedge is the Track to Warpsgrove House a short distance from Golder Hill. Warpsgrove House has sunk from trace but Ancient documents reveal its precise Location. Parliament “left a Reserve of 3-Cornets in the Close aforesaid among the trees by Warpsgrove House”. – “We discerned them to be 8-Cornets of Horse” that faced the Royalists – “we were now parted by a Hedge” – Rupert “Leapt the Hedge that parted us from the Rebels.” – “they were in sight of one another, by 9-o’clock in the morning”.
The Royalist Cavalry, Schooled by Prince Rupert to rely on shock action, deployed 3-deep. Allowing 5-ft per man, the 1,000+ Royalist Cavalry would have had a Frontage of at least 600-yds. The intervals between sub-units and the probable excess in their number suggest that 800-yds would fairly represent their Front. The Fight had been Short & sharp and the Royalist Troops returned in safety to Oxford
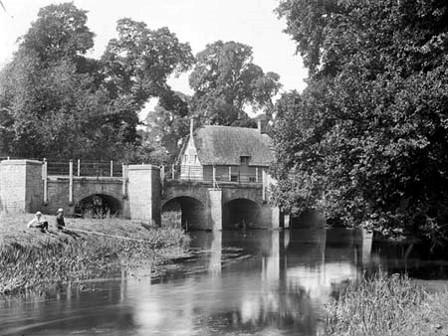
Chiselhampton Bridge is an important Historical Site on the River Thame – when built it determined the Site of the Village of Chiselhampton, and the River has since marked the Boundary between Chiselhampton & Stadhampton. The earliest recorded date of the Bridge is 1444, when the men of Chiselhampton were Granted Pontage (the Right of Toll for Bridge upkeep) for it. It has been rebuilt over the years with Stone Arches, altered by multiple repairs, extended, and in 1899 widened with Steel Troughing. It is now 54M long and has 8-Stone Arches. The Bridge played an interesting role in the Civil War – in 1642 King Charles’s Court was at Oxford, so Control of the Bridges on the River Thame became vital to their Defence. In 1643 the Bridge was Gated – nobody was allowed to cross it apart from on Market Days and other minor exceptions.
Both of Essex’s sources are in some way inaccurate and so consequentially is his Account of Chalgrove. Subsequent Historians who have used Clarendon as their source have perpetuated this Myth of Chalgrove being a Minor Skirmish. This treatise sets out to explain that the Action at Chalgrove was in fact large enough in Scale to be considered a Battle. It also argues that its importance was in debilitating Essex’s Parliamentary Army, rather than simply in the Death of John Hampden. Essex’s Diseased, Ill Supplied and now Leaderless Army left Oxfordshire not to return until early September. The idea of Chalgrove as a Minor Skirmish result from confusion with a separate Action at nearby South Weston. New understanding & analysis of contemporary Documents clearly show that after the Raid on Chinnor a Skirmish involving 300-Parliamentarians took place.
(Two Letters from his Excellency Robert Earl of Essex. The one unto the Speaker of the House of Commons; relating the true facts of the Skirmish at Chinnor, between a Party of Kings & Parliament’s Forces written on the Sabbath Day Sunday 19th June 1643 with the number of such persons as was Taken & Slain on both Sides).
(A True Relation of a Gret Fight Between the King’s Forces and the Parliaments, at Chinner neer Tame on Saturday last. With the manner how the King’s Forces made the Assault, and by what meanes they were Forced to Retreat. Also in what manner Colonell Hampden is wounded, with the names of the Chiefe Commanders that were killed and taken Prisoners on both sides: As also the Firing and Burning of the Towne of Chinner, by the King’s Forces, and many other remarkable passages concerning the said Fight).
A True Relation of a Great Fight – Printed Between 19-24th June 1643
Around South Weston at about 8.15-am. This is the Encounter that Essex, by Accident or Design, confused with the Battle of Chalgrove. As a result, the usual Figure given for the number of Parliamentarian Combatants in the Action at Chalgrove is inaccurate. Essex stated that only 300–Parliamentarians were engaged at the Battle, yet a Royalist Account states there were 13–Troops of 70 Men plus 100–Dragoons, which equals about a 1,000-men. This Account has been Cited by Brigadier Peter Young in an unpublished Paper, but even he only estimates a Force of 600–800 men. The accepted View of the duration of the Battle also has to be queried. English Heritage relates that ‘The Fight had been Short & Sharp’, but this Statement probably relates to the Skirmish at South Weston.
The Site of the Battle likewise requires further analysis. According to a contemporary Royalist Account (‘The Late Beating Up’), Prince Rupert paused in a Chalgrove Cornfield (or Open-field) to see the Rebels coming down Golder Hill towards him, noted their Disorder & Feigned his Retreat.

Lord Nugent Cites the Battlefield as being in a Cornfield by a Hedgerow that formed the Boundary of Chalgrove. Nugent had approached potential subscribers with the promise that a Monument would be raised where John Hampden was Mortally wounded. Renn Dickson Hampden DD made a generous offer of a prestigious Plot at the Crossroads of the Watlington to Oxford Road, nowhere near the Parish Boundary. In the full knowledge that the Area around the Crossroads was not the Site of Hampden’s Mortal Wounding. Lord Nugent accepted Renn’s generous offer. Lord Nugent placed an Advert in The Aylesbury News, 27th May 1843 which had as a Headline, ‘Hampden Commemoration on Chalgrove Field’. The Area around the Monument was not known as Chalgrove Field in 1843 and it is still not recognised as such. However, in 1880 Ordnance Survey’s Cartographers assumed this to be the Battle Site & Marked their Map ‘Site of Battle (AD-1643)’ and with a broad brush, the Area was renamed Chalgrove Field. It is from this confusion that 20thC Historians placed the Battle near the Monument and named it the Battle of Chalgrove Field. Other major features in the Landscape are important to the Battle and are misplaced in the received View, including the Siting of Hedges. It is known that the Protagonists faced each other over a Hedge and that this Hedge was thin enough for Prince Rupert to jump over and his Lifeguard to ‘jumble over after him’.

The Received View has the Protagonists facing each other over a Hedge near the Monument, North of the Watlington to Oxford Road. The Ordnance Survey’s 1881 Map placed the Battle on false evidence South of the Watlington to Oxford Road. The absurdity of this Location for the Battle became apparent when English Heritage drew up their Battlefield Register. Early Maps depict Hedges Lining the Watlington to Oxford Road, features that would have prevented Rupert from facing the Rebels in one Horse Leap. With Military Logic, the Battle Site was moved 500-yds Northwards, but its Placement still used the flawed evidence of Nugent & the Ordnance Survey.
1st Series OS Map Sheet-13
Another Hedge of significance is the ‘Great Hedge’ which helped to define the movement of Troops before the Battle. Great Hedges, since Medieval times, defined & marked the Boundaries of Parishes. The Parliamentarians coming down Golder Hill were in the Parish of Pyrton and Ordered themselves among the Trees on the edge of Lewknor Meadow. Looking across the Meadow beyond the ‘Great Hedge’ into Chalgrove Field they saw the Royalist Cavalry in Battle Formation. A remnant of this Hedge has a double-line of Stock-proof Hedges with sufficient space between to Ride Horses side by side. Rupert could not & did not jump this Hedge as it was too wide and he would have left Chalgrove to Fight the Battle within the Parish of Pyrton.

Casualties & Losses
Royalist – Besides few common men, no Officers of note, but some hurt.
Parliamentarians – Major John Gunter – Killed
Colonel John Hampden – Mortally wounded, dying 6-days later at Thame.
50-Killed at Chinnor.
Approx. 100-Killed at Chalgrove.
120-Prisoners taken at Chinnor.
80-Prisoners taken at Chalgrove.

The Location of Warpsgrove House is significant too since the ‘Late Beating Up’ names Warpsgrove House as the place where the Parliamentary Reserves were Assembled.
His Highnesse Prince Rupert’s late beating up the Rebels Quarters at Postcomb & Chinnor in Oxfordshire. Also his Victory in Chalgrove Field. Whereunto is added Sir John Urries Expedition to West-Wickham (1643).
The Location of the Foliots’ House and of the Templars’ Grange is unknown but was probably close to the former Church & Village. No later Lords were Resident, but in 1519 the Lessee was given Timber to repair ‘Houses standing upon the Site of the Manor’, and a Building labelled Warpsgrove House was shown on a Map of 1612. The Map-maker identified it with the former Parish Church (by then almost certainly in Ruins), suggesting that the 2-Lay closely adjacent. Possibly that was the House inhabited by a Resident Shepherd or Yeoman in the early 17thC & Warpsgrove House was again mentioned in 1643 in an Account of the Civil War Battle of Chalgrove. Its date of Demolition is unknown.
English Heritage Battlefield Report: Chalgrove 1643

The House is a Vital Landmark in the Siting of the Battle as the Reserves would not have been far from their Troops. There has been much controversy about the Location of the House because it does not survive, but research provided a better indication of its Site. Finally, the received view does not take into account the Armies’ Manoeuvrings on the wider canvas prior to and after Chalgrove. Pay Warrants reveal that Essex’s Principal Officers were at their Thame Headquarters collecting their Regiments’ Pay when the Alarm came from Chinnor, so they joined in the Trailing of Rupert en masse. It was the loss of many of these Senior Officers, compounded with the widespread Fever amongst the Army, which caused disintegration & Essex removing the Army of the South from Contention.
After the ensuing Siege & Surrender of Oxford in 1646, Parliament Banished both Rupert and his brother Maurice from England. Following the Restoration, Rupert returned to England, becoming a Senior Royal Navy Commander during the 2nd & 3rd Anglo-Dutch Wars, Engaging in Scientific Invention, Art & Serving as the 1st-Governor of the Hudson’s Bay Company. Rupert died in England in 1682, aged 62.

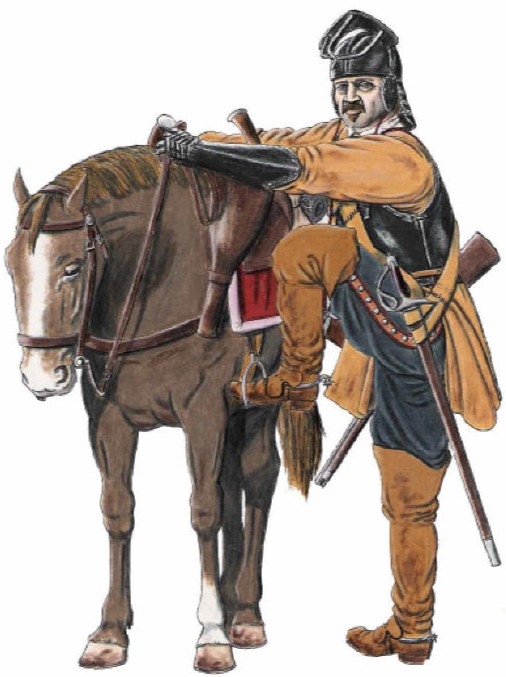
Cavalry, English Civil War c.1644
The Arms & Equipment of Cavalry Troopers of both Sides during the Civil War were more or less identical. Most Cavalrymen were equipped with Armour consisting of Breast & Back Plate worn over a ‘Buff’ Coat of heavy Hide. In this instance a Sleeved version. Many Troopers were also equipped with a ‘Pot’ Helmet with Cheek Guards, Neck Guard & Peak with 3-Bar Defence for the Face.

This particular ‘Cavalier’, perhaps a Trooper of Prince Rupert, wears no Helmet, instead bears a broad brimmed, Plumed Hat, perhaps with a Steel Skullcap or ‘secrete’ beneath as some protection for the Head. As was common, this Trooper is Armed with 2-Pistols, carried in Holsters on the Saddle, in this instance Wheel Lock Weapons, the Spanner required for Winding the Mechanism is slung around his body. Some Troopers were also issued with a Carbine. This Man represents many of the Cavalry of both Parties in the War and could be only distinguished as a Supporter of the King by his Red Sash. Most Cavalry were equipped & dressed in this way, although early in the War a few Units were equipped in full Armour & Fought as Heavy Cavalry and were commonly known as ‘Lobsters’ due to their Armoured Shells. Initially, in the War the Royalist Horse under the dashing Prince Rupert Outclassed their Parliamentary Opponents despite their lack of Discipline, however as the War progressed the Cavalry of the New Model Army proved more than a Match for the Royalist Horse.
New Model Army
The New Model Army Raised by the Forces of Parliament in the English Civil War can be said to be the 1st truly Professional Army in Britain and the forerunner of the British Army. The Army was Commanded by Generals Sir Thomas Fairfax, Skippon & Oliver Cromwell. It had Infantry, Cavalry & Dragoons and all Men were Trained & Disciplined to a High Standard.
This well-equipped Cavalryman represents a Trooper of Parliament’s New Modelled Army. The Cavalry of this newly raised Professional Force being commanded by General of Horse, Oliver Cromwell. They were Trained & Disciplined far more than their Royalist opponents and this ultimately led to their frequent success in Battle, so gaining them their nickname of ‘Ironsides’. The Trooper is equipped as ‘Medium Cavalry’, with Breast & Back Plate & Pot Helmet worn over a Sleeved Buff Coat. The Armour is ‘blackened’ to protect it from Rust. A ‘Bridle Gauntlet’ protects his Left Hand. He is Armed with Sword, 2-Pistols & a Carbine and is perhaps better equipped than many of his Opponents. The Armour & Equipment shown are based on examples surviving at Littlecote House. This is standard ‘Harquebusier’s Armour’ which was worn by both Sides, this man is distinguished as a ‘Roundhead’ by the ‘Orange Tawny’ Sash adopted by many Parliamentary Forces.

Cromwell’s Troopers gained a deserved Reputation during the course of the War for their Discipline & Zeal in Battle. It was this Discipline that led to their Superiority over the Royalist Horse, who, for all their Dash, lacked the Discipline to Fight Efficiently, so losing their advantage in several Battles when, after a successful Charge they failed to press home their Advantage & Galloped Off after their Retreating Enemy or Looted their Opponents’ Camp or Baggage Train.
This Man is a Musketeer, he wears the Red Coat adopted by the Army and has no Armour, unlike the Pikemen making up the other Infantry Element. In his Broad brimmed Hat he wears a Field Sign, in this case a folded piece of paper or pamphlet, a Sign worn to distinguish Friend from Foe in the Smoke of Battle when similar Uniform was likely to be Worn by both Sides. He is Armed with a Musket, in this case, an English ‘Dog Lock’, a variation of the Flintlock and a better system than the earlier Matchlock. The Charge being Fired when the Trigger is pulled so releasing the Hammer which strikes the Pan causing the Spark which Ignites the Powder & Fires the Gun. His Powder Charges are held in Blue painted Wooden containers, called the ‘12 Apostles‘ and his Priming Powder is contained in a Flask. The Man’s only other Weapon is a simple Sword or ‘Tuck‘ although contemporary accounts show that in Close-Combat Musketeers were more likely to use the heavy Butts of their Muskets as the preferred Weapon of Offence.
